
Prepare your workspace and tools
A safe, organized workspace prevents accidents and ensures the installation proceeds without interruption. Clear the area around your parking spot and the garage wall where the charger will mount. Remove any clutter, tools, or vehicles that block access to the electrical panel or the intended mounting location.
Lighting and dryness are non-negotiable. Ensure the garage is well-lit so you can see clearly while handling electrical components and drilling. If your garage is prone to moisture or leaks, address those issues first. Working in a damp environment while installing a high-voltage charger is dangerous and can void warranties.
Gather your tools before you start. You will likely need a drill, screwdrivers, a voltage tester, and possibly a stud finder. Ensure your phone is charged and connected to Wi-Fi if you plan to use the Tesla app to monitor the vehicle state.
Shut Down the Vehicle Correctly
Before installing the wall charger, ensure the car is completely powered down. Leaving the vehicle in sleep mode or with systems active can cause battery drain or trigger system errors that complicate the electrical work. A proper shutdown isolates the high-voltage systems and prepares the car for the installation process.
Start by parking the car in a safe, flat location and engaging the parking brake. Use the touchscreen to go to Controls > Safety > Power Off. Confirm the shutdown when prompted. Alternatively, use the Tesla app to send a "Power Off" command remotely.
Place the car in Park and engage the parking brake. Ensure the vehicle is in a well-lit area if you will be working around it. This prevents any accidental movement while you are setting up the charger.
On the central display, tap the car icon in the bottom left corner. Select "Controls" from the menu, then choose "Safety." Tap "Power Off" and confirm your choice. The screen will go black, but the car may remain in a low-power state for a few minutes.
Wait until the touchscreen is completely dark and the power button light is off. If the car is still in sleep mode, you can use the Tesla app to send a "Power Off" command remotely. This ensures all high-voltage systems are disconnected and safe for your electrician.
Mount the Wall Connector Hardware
With the circuit breaker turned off and the conduit run complete, it is time to mount the Tesla Wall Connector. This step requires precision to ensure the unit sits level and securely against your garage wall. A loose mount can lead to cable strain or an unsightly installation.
Prepare the Mounting Template
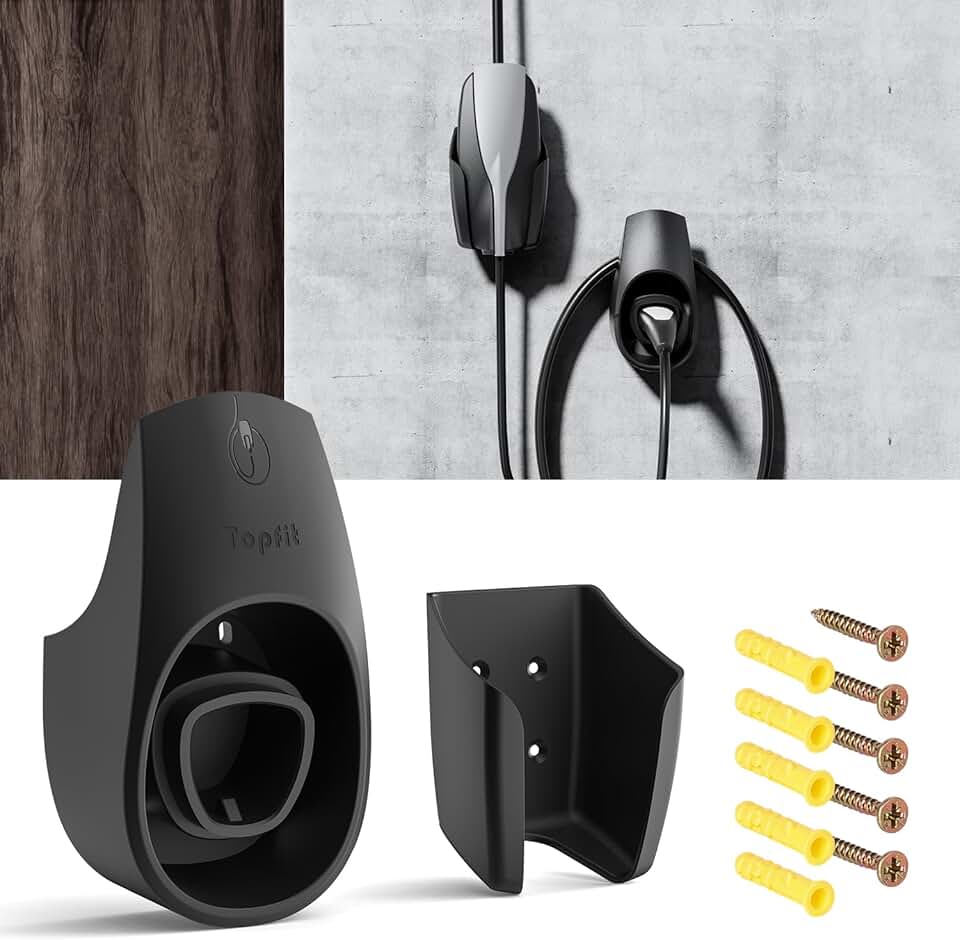
Start by removing the Wall Connector unit from its mounting bracket. Keep the bracket and the provided paper mounting template. Place the template on the wall where you intend to install the charger. Use a level to ensure the template is perfectly horizontal. Mark the four screw holes with a pencil.
If you are mounting on drywall, locate the wall studs behind the markings. Mounting directly into studs provides the most secure hold. If the studs do not align with the template holes, use heavy-duty drywall anchors rated for the weight of the charger. The Wall Connector is relatively light, but the cable adds tension when plugged in.
Drill and Secure the Bracket
Remove the paper template. Drill pilot holes at your marked points. If you are hitting concrete or brick, use a masonry bit and insert plastic anchors. For wood studs, a standard wood bit is sufficient.
Position the metal mounting bracket over the holes. Secure it with the provided screws. Double-check the level one last time before fully tightening the screws. The bracket must be flush against the wall to ensure the charger snaps on correctly.
Attach the Wall Connector
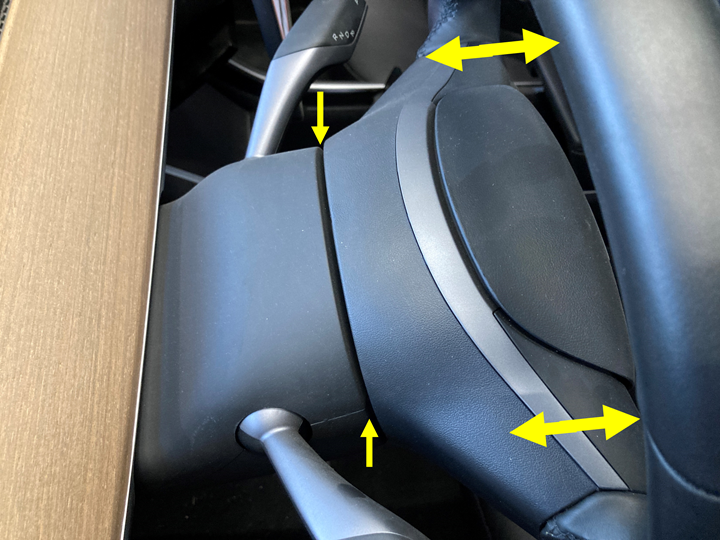
Align the back of the Wall Connector with the mounted bracket. The unit should slide or snap into place, depending on the specific model. You will hear or feel a click when it locks.
Once attached, the physical installation of the hardware is complete. The final step is to restore power and configure the settings via the Tesla app.
Connect power and test the charger
Before the charger can talk to your car, it needs a steady, safe connection to your home’s electrical system. This section covers the final wiring steps and the verification process to ensure everything is ready for daily use.
Secure the circuit breaker
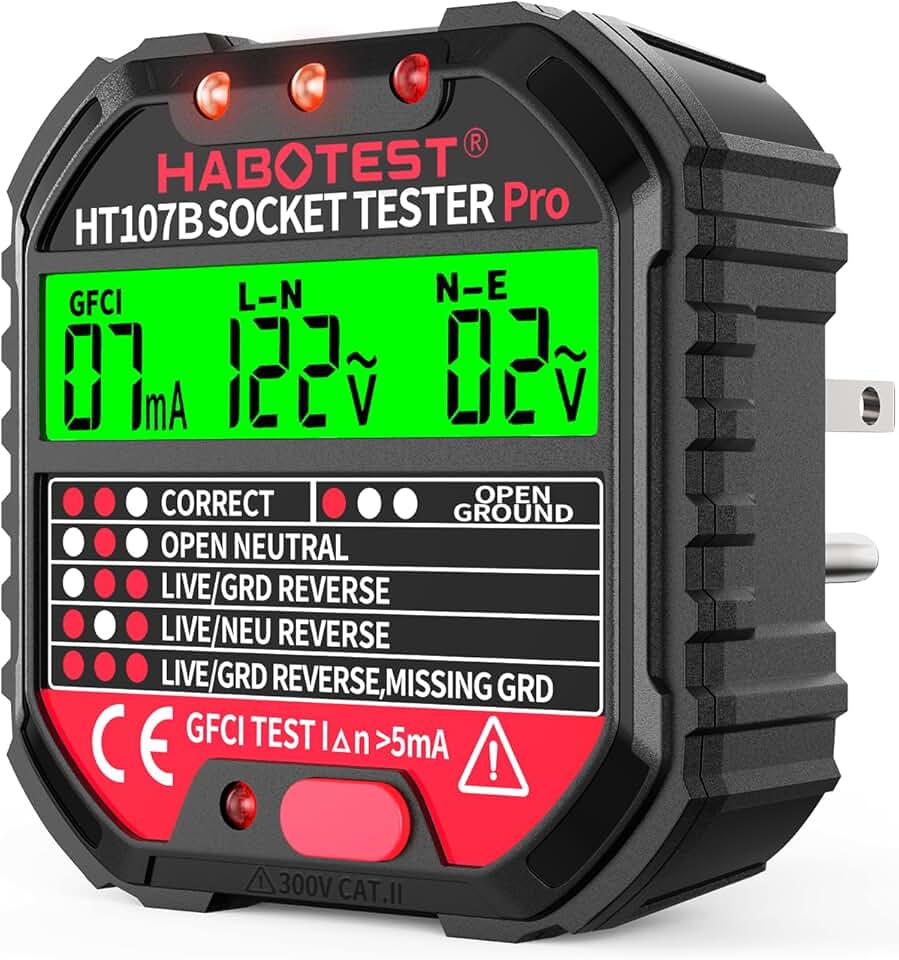
Turn off the main power to your panel before working on any circuits. Locate the specific breaker for your new charger line and switch it to the OFF position. Verify the power is off using a non-contact voltage tester at the junction box. This step is non-negotiable for safety.
Wire the charger to the panel
Connect the charger’s power cables to the appropriate terminals in your sub-panel or main breaker box. Ensure the hot wires connect to the breaker lugs, the neutral wire to the neutral bus bar, and the ground wire to the ground bus bar. Tighten all connections firmly to prevent arcing or heat buildup over time. Use a torque screwdriver if specified in the charger’s manual to avoid over-tightening.
Power on and verify communication
Flip the breaker back on. The charger’s display should light up, indicating it has received power. If your charger has a mobile app, open it now to confirm the device is online. You should see a status update showing the charger is ready but not yet charging. This confirms the electrical connection is stable and the internal electronics are functioning.
Test with your vehicle
Plug your Tesla into the charger. The vehicle’s charge port light should pulse amber, indicating it is communicating with the charger and ready to accept power. Start a charge session via the Tesla app or the car’s touchscreen. Watch for the first few minutes of charging to ensure the current is flowing smoothly. If the charger fails to start, check your breaker status and app connectivity before calling for professional support.
Verify settings in the Tesla app
Now that your wall connector is installed, the final step is configuring the software side. The Tesla app serves as your command center, allowing you to manage charging schedules, energy limits, and real-time status from anywhere. Proper configuration ensures your car charges efficiently without straining your home electrical system.
Open the Tesla app and select your vehicle. Navigate to the Charging tab to access key settings. Here, you can set a Charging Limit to protect your battery health, typically recommended at 80-90% for daily use. You can also define a Departure Time to schedule charging during off-peak electricity hours, which significantly reduces costs.
Ensure Charging Current is set appropriately for your circuit breaker rating. If you installed a 40A charger, set the current to 32A to maintain a safe safety margin. Double-check that Sentry Mode and Dog Mode are configured as desired, as these features draw power even when the car is off. Once verified, your setup is ready for reliable, optimized charging.

As an Amazon Associate, we may earn from qualifying purchases.
Final safety checklist before driving
Before you take your car on the road, verify that the installation is secure and the vehicle systems are communicating correctly. This final review ensures your Tesla and the new charger operate in sync without errors.
Verify charger status and connection
Confirm the wall charger displays a solid green light, indicating it is ready to charge. Plug the connector into your Tesla and ensure it clicks firmly into place. A loose connection can trigger charging faults or prevent the car from drawing power. Check that the cable is routed away from foot traffic and doorways to prevent tripping or damage.
Confirm vehicle readiness via the app
Open the Tesla app on your phone and check the vehicle status. Ensure the car reports no active service alerts or charging errors. If the app shows the car as "Unplugged" despite the connector being seated, try unplugging and reinserting the charger. You can also use the app to start a test charge session to verify power delivery.
Check for local code compliance
Ensure the installation meets local electrical codes. The charger should be mounted securely on a weatherproof outlet box if installed outdoors. Verify that the circuit breaker is labeled clearly and accessible. If you notice any burning smells, sparks, or tripped breakers during this test, stop immediately and contact your electrician.
Run a quick test charge
Initiate a short charge session from your car’s touchscreen or the Tesla app. Monitor the first few minutes of charging to ensure the amperage matches your settings. If the charge stops unexpectedly or displays a "Charger Not Communicating" error, unplug the device and restart the charger. Once stable, you are ready to drive.
Common charging errors and fixes
Even with a proper installation, connection issues can pop up during your first few charges. Most errors stem from communication glitches between the charger and the car, or environmental factors. Here is how to resolve the most frequent hurdles.
Charger won’t start charging
If the wall connector powers on but the car shows no charge, check the physical connection first. Ensure the charging handle is fully inserted into the vehicle’s port until you hear the latch click. A loose connection breaks the data handshake required to initiate power flow.
Error codes on the charger display
The charger screen will display specific error codes if it detects a fault. Consult the Tesla Wall Connector manual for code definitions, but common fixes include checking the circuit breaker. If the breaker has tripped, reset it. If the error persists, the charger may need professional service.
Vehicle won’t accept charge
Sometimes the car itself blocks the session. Check the Tesla app to see if the vehicle reports a battery thermal management issue or a fault. You can also try restarting the vehicle’s infotainment system by holding down the scroll wheels on the steering wheel for ten seconds. This often clears temporary software glitches.
Charging speed is slower than expected
The Wall Connector can deliver up to 48 amps, but the car limits the actual current based on battery temperature and state of charge. If the battery is very cold or nearly full, charging will naturally slow down. This is a safety feature, not a malfunction. Wait for the battery to warm up or adjust your charging limit in the car’s menu.
No comments yet. Be the first to share your thoughts!