
Skip oil changes, keep tires fresh
Tesla maintenance starts with a simple realization: there is no engine oil to change. Unlike internal combustion vehicles, Teslas have no spark plugs, fuel filters, or transmission fluid that requires periodic replacement. You also won’t need to worry about emission tests or exhaust system repairs. This absence of traditional mechanical wear points removes dozens of routine service visits from your calendar.
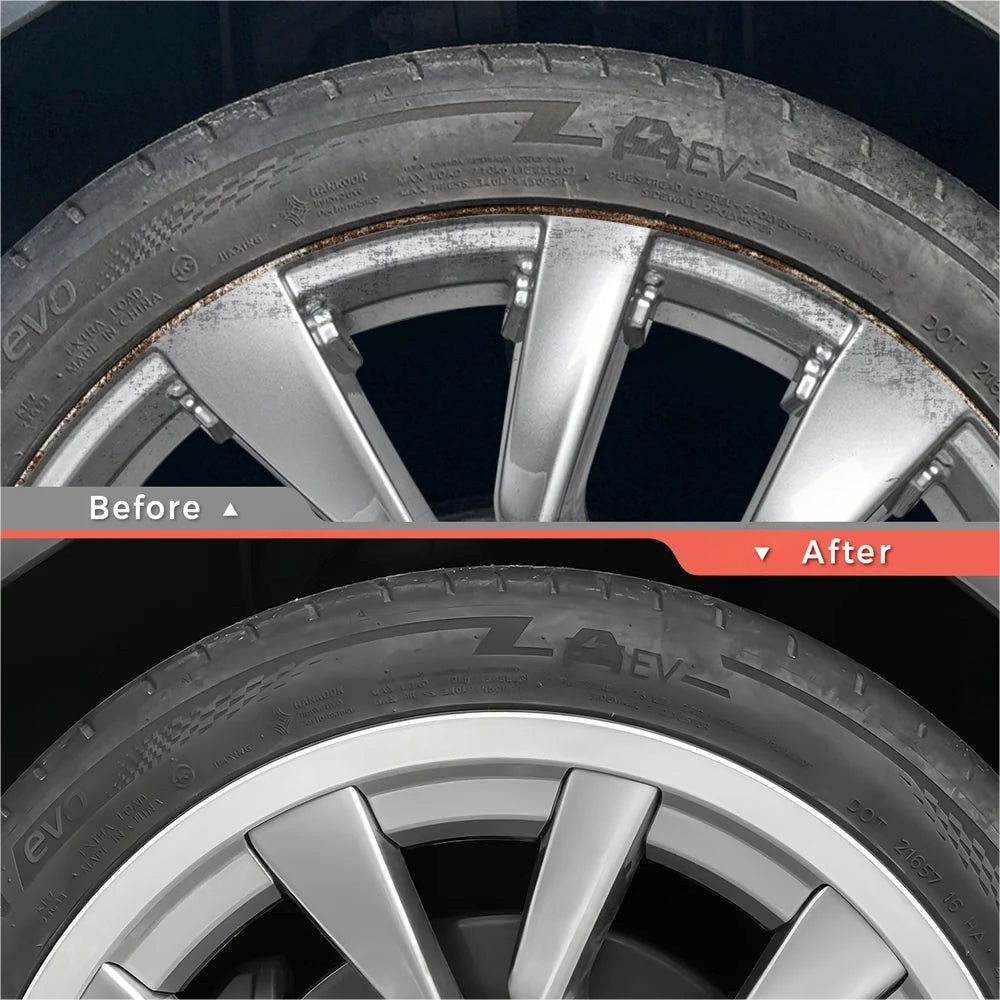
However, the absence of an engine doesn’t mean the car is maintenance-free. The weight of the battery pack and instant torque place unique demands on other components. Tires are the first place you will see wear. Rotating them every 6,000 to 7,500 miles helps ensure even tread wear, which is critical for maintaining range and handling. Brake fluid also requires attention; Tesla recommends testing it every two years and replacing it if the moisture content exceeds limits, preventing corrosion in the braking system.
While brake pads last significantly longer due to regenerative braking, they are not immune to wear. Most owners go years without replacing them, but visual inspections during tire rotations are still wise. The overall cost of Tesla maintenance is generally lower than for gas cars, primarily because there are fewer moving parts to fail and no oil changes needed. Think of your Tesla’s maintenance list as a short checklist of tire and fluid checks rather than a long schedule of engine overhauls.

Rotate tires and check fluids
Routine maintenance on a Tesla is less about constant mechanical intervention and more about disciplined visual inspection. While the electric drivetrain removes the need for oil changes and timing belts, the physical components that contact the road and manage braking still require regular attention. Following a structured Tesla maintenance schedule for tire rotation and brake fluid health prevents minor wear from becoming expensive repairs.
Rotate tires for even wear
Tires are the only point of contact between your vehicle and the road, and they wear at different rates depending on the drivetrain. All-wheel-drive models experience more complex wear patterns than rear-wheel-drive versions because power is distributed across four wheels. Rotating the tires every 6,000 to 8,000 miles ensures that tread depth remains consistent, which preserves handling stability and extends the lifespan of the set.
- Check tire pressure when the tires are cold. Use the door jamb sticker or the vehicle touchscreen to find the recommended PSI.
- Loosen the lug nuts slightly before lifting the vehicle to prevent the wheel from spinning.
- Lift the vehicle using a jack rated for your specific model, then remove the wheels.
- Follow the rotation pattern specified in your owner’s manual. For rear-wheel-drive models, this typically means moving rear tires straight forward and crossing the front tires to the rear.
- Reinstall the wheels, hand-tighten the lug nuts, lower the vehicle, and torque them to the manufacturer’s specification.
Inspect brake fluid every four years
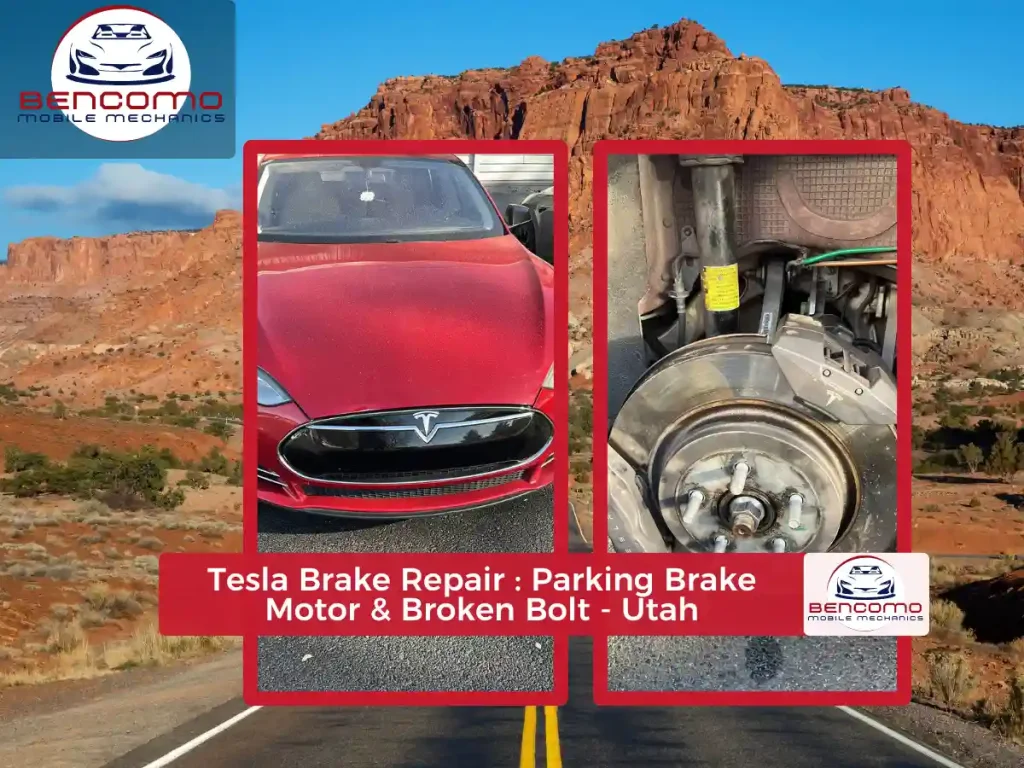
Tesla vehicles use regenerative braking to slow down, which significantly reduces wear on the physical brake pads. This efficiency can lead to a different kind of problem: brake fluid degradation. Brake fluid is hygroscopic, meaning it absorbs moisture from the air over time. This moisture accumulation can lead to corrosion inside the brake lines and calipers, even if the pads themselves look brand new.
Tesla recommends a brake fluid health check every four years. During this service, a technician will test the fluid’s boiling point and moisture content. If the fluid fails the test, it must be flushed and replaced. This is a critical part of long-term Tesla maintenance because brake failure is rarely visible until it is too late. Ignoring this interval can result in costly repairs to the brake hydraulic system.
Top up windshield washer fluid
While not a mechanical fluid, washer fluid is the most frequently depleted reservoir. Tesla’s sensor system does not always trigger a dashboard warning immediately, so it is wise to check the level visually or via the touchscreen menu during your monthly tire inspections. Use a high-quality washer fluid formulated for your climate, especially if you live in an area with hard water or extreme temperatures. Low washer fluid is a quick fix that prevents visibility issues during rain or snow.
Final visual check
After rotating tires and verifying fluid levels, perform a quick walk-around inspection. Look for any cuts, bulges, or uneven tread wear on the tires, which could indicate alignment issues. Check under the vehicle for any fresh fluid leaks. If everything looks clean and the pressure is correct, your Tesla is ready for the road. These small, routine tasks keep the vehicle safe and maintain its resale value without requiring a trip to the service center for every minor issue.
Swap cabin filters and wipers
Replacing the cabin air filter and wiper blades is the simplest way to handle routine Tesla maintenance without booking a service appointment. These two tasks require no special tools and take less than ten minutes each. Doing them yourself saves money and ensures you know exactly when your vehicle’s air quality and visibility components were last updated.
Cabin air filter replacement
The cabin air filter sits behind the front trunk (frunk) liner. Over two years, it traps dust, pollen, and exhaust particles. If you notice reduced airflow from the vents or a musty smell, it’s time for a change. Tesla recommends replacing this filter every two years, though driving in dusty or high-pollution areas may require annual swaps.
- Open the frunk and locate the black plastic filter housing on the passenger side.
- Unclip the two plastic latches holding the housing cover in place.
- Slide the old filter out and note the airflow arrow direction printed on its frame.
- Insert the new filter with the arrow pointing down toward the cabin floor.
- Snap the cover back on and ensure the latches click securely.
Wiper blade replacement
Wiper blades typically last about a year before the rubber degrades, especially in sunny climates. Streaking or chattering noises during use indicate the blades need immediate attention. Unlike many traditional cars, Teslas use a specific hook-style connector that is easy to swap once you know the release mechanism.
- Lift the wiper arm away from the windshield until it locks in the service position.
- Press the small plastic tab on the wiper blade connector.
- Slide the old blade down and off the J-hook arm.
- Slide the new blade onto the hook until it clicks into place.
- Gently lower the arm back onto the glass.
Keeping these small components fresh is a core part of responsible Tesla maintenance. It prevents strain on the wiper motor and ensures the HVAC system runs efficiently, keeping your cabin air clean and your view clear.
Install the Wall Connector Safely
Installing a Tesla Wall Connector is a standard Tesla maintenance task that requires careful planning and adherence to electrical codes. Proper installation ensures your vehicle charges efficiently while keeping your home’s electrical system safe. This guide walks you through the physical mounting, conduit routing, and final electrical connections.
1. Choose the Right Location
Select a mounting spot that allows the charging cable to reach your vehicle’s port without stretching. The ideal location is within 20 feet of your vehicle’s parking position to minimize voltage drop. Ensure the area is protected from direct weather exposure if possible, though the connector is rated for outdoor use. Avoid mounting it too low where it might be damaged by road debris or too high where it becomes awkward to handle.

Secure the metal backplate to a solid surface using the provided lag screws and anchors. If mounting to drywall, you must locate and anchor into a wall stud for stability. Use a level to ensure the plate is perfectly straight before tightening the screws completely. This backplate serves as the foundation for the entire unit, so precision here prevents mounting issues later.
Route your electrical conduit from the backplate down to your main service panel. Use 3/4-inch EMT or rigid conduit for durability and code compliance. Pull a dedicated 6 AWG or 8 AWG copper wire (depending on your breaker size) through the conduit. Leave enough slack at both ends to make clean connections at the panel and the connector. Ensure all wire connections are tight and secure to prevent arcing or heat buildup.
Turn off the main power at your service panel before opening it. Identify a dedicated double-pole breaker (typically 40A or 60A) and attach the black and white wires from your conduit to the breaker terminals. Connect the ground wire to the panel’s ground bus bar. Double-check all connections for tightness and ensure no bare wire is exposed. Once verified, snap the breaker into place and close the panel cover.
Hang the Tesla Wall Connector onto the mounted backplate. The unit should click securely into place. Connect the internal wires to the terminal block inside the connector according to the color-coded diagram: black to L1, white to neutral, and green to ground. Secure the cover plate and ensure the latch closes firmly. The installation is now physically complete, ready for software activation.
Final Safety Checks
Before using the charger, verify that the breaker is in the "off" position during installation, and only turn it on after all connections are verified. Tesla vehicles require no traditional oil changes or spark plug replacements, but their electrical systems demand strict adherence to safety protocols. If you are unsure about any step, consult a licensed electrician. Proper installation is a critical part of responsible Tesla maintenance.
Fix common glitches and drains
Tesla maintenance often involves troubleshooting quirks that don’t require a service center visit. Owners frequently report phantom battery draining, screen freezes, or connectivity drops. These issues usually stem from software states or minor sensor errors rather than major mechanical failure.
Resolve screen freezes and software lag
A frozen touchscreen is the most common complaint. Instead of waiting for an over-the-air update, perform a manual soft reboot. Press and hold both scroll wheels on the steering wheel until the screen goes black and the Tesla logo appears. This forces the infotainment system to restart without affecting the vehicle’s drive systems.
If the screen remains unresponsive, hold the brake pedal and the two scroll wheels for 10–15 seconds until the power button icon appears on the display. This deeper reset clears temporary cache files that often cause lag or black screens.
Address phantom battery draining
Phantom draining occurs when the battery loses charge while the car is parked. This is often caused by the Sentry Mode or Cabin Overheat Protection running unnecessarily. Check your car’s app to see if these features are active. If you don’t need them, disable them in the Safety & Security settings to preserve range.
Another common cause is a stuck door or trunk latch. If the car thinks a door is ajar, it keeps the interior lights and modules active. Walk around the vehicle to ensure all doors, the frunk, and the trunk are fully closed. Listen for the distinct click of the latches engaging.
Reconnect Wi-Fi and Bluetooth
Connectivity issues often stem from the car’s network module hanging. If your car won’t connect to Wi-Fi or your phone via Bluetooth, toggle the Wi-Fi setting off and on in the Controls menu. If that fails, perform the same soft reboot described above for the touchscreen. This usually reinitializes the network stack and restores connectivity.
Review annual service costs
Tesla maintenance costs sit significantly lower than those for comparable internal combustion vehicles, primarily because the electric drivetrain eliminates oil changes, spark plugs, and complex transmission services. While the upfront purchase price is higher, the long-term operating expenses tell a different story.
Based on current data, most Model 3 and Model Y owners spend between $300 and $700 annually on routine upkeep. This range covers tire rotations, cabin air filter replacements, brake fluid checks, and the occasional battery coolant flush. For Model S and Model X owners, the range is slightly wider, typically landing between $338 and $5,800 depending on mileage and specific model year requirements.
The majority of this cost comes from wear items like tires and brakes, which last longer due to regenerative braking but require specific EV-rated compounds. As noted in Tesla’s own breakdown, the estimated annual maintenance cost for a Model Y is roughly $316 to $6,438, with the lower end representing typical commuter driving and the higher end reflecting aggressive performance use or older vehicle depreciation.
To keep these costs predictable, follow the service schedule outlined in your vehicle’s touchscreen. Most annual visits are quick inspections rather than full overhauls, keeping downtime minimal and expenses manageable.
-
Clear all personal data from the center screen
-
Remove any roof racks or cargo carriers
-
Ensure the vehicle is charged above 50%
-
Have your service key or phone key ready
-
Note any specific warning lights or noises for the service advisor
Common Tesla issues and fixes
Most problems are software glitches or minor wear items, not major mechanical failures. Here is how to handle the most frequent issues.
For persistent hardware issues like door handle failures or charging port malfunctions, refer to the official Tesla support documentation for diagnostic steps before scheduling a service appointment.
No comments yet. Be the first to share your thoughts!