
Why proper shutdown matters
Playing a Tesla means more than just driving it. The car is a computer on wheels, and how you turn it off affects its long-term health. A proper shutdown ensures the battery stays stable and the software systems reset correctly. Skipping this step can lead to glitches or reduced battery lifespan over time.
Think of the shutdown process like closing all the tabs on your laptop before putting it to sleep. If you just slam the lid, background processes might keep running, draining power and causing heat. Tesla’s high-voltage systems need a clear signal to stop. When you park and lock the car correctly, the vehicle enters a low-power standby mode. This keeps the battery safe and ready for your next trip.
Ignoring the shutdown sequence can leave the car in a "sleeping but awake" state. Sensors and infotainment systems may stay active, draining the 12-volt battery or the main pack. This is especially risky if you plan to leave the car parked for days. A clean shutdown prevents these phantom drains.
To avoid issues, always follow the correct steps to park and lock your Tesla. This simple habit preserves your battery health and ensures the car’s systems remain intact. It’s a small action that makes a big difference in the long run.
Turn off the Tesla before installing the charger
Before you begin the installation process, you must ensure the vehicle is completely powered down. This step is critical for safety, preventing any electrical feedback or system errors while you work on the charging infrastructure. Think of this like turning off the main breaker before working on home wiring; it isolates the high-voltage systems and puts the car in a safe state.
Follow this sequence to properly shut down your Tesla. Do not skip any steps, as leaving the car in "Drift" or "Ready" state can keep auxiliary systems active, which may interfere with the installation or pose a risk.
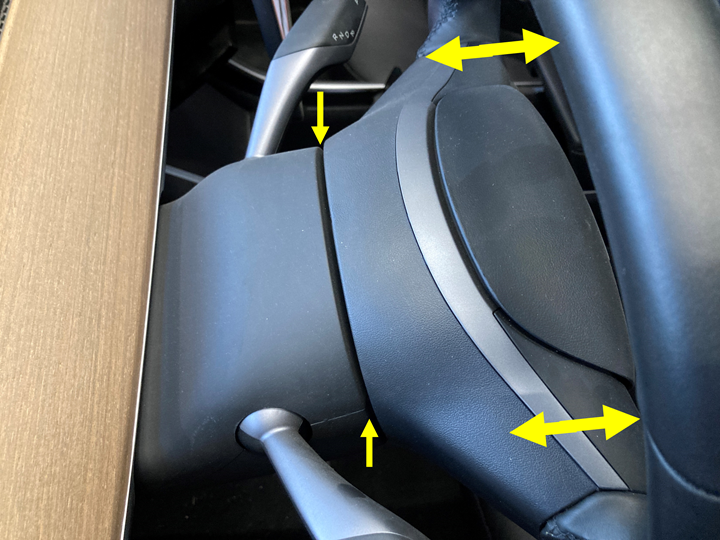
Ensure the car is in a stationary position. Press the brake pedal and confirm that the gear selector is set to Park. Engage the electronic parking brake by pulling up on the brake switch. This secures the vehicle and prevents any unintended movement while you work.
Tesla’s shutdown sequence requires all entry points to be closed. Make sure the driver and passenger doors, as well as the front trunk (frunk), are fully shut. The center screen will display a red outline if any door is ajar. If the screen is locked or unresponsive, this step cannot be completed until the physical latch is engaged.
On the center touchscreen, tap the Car icon at the bottom left. Select Safety & Security > Power Off. Confirm the action when prompted. The screen will go black, and the vehicle will begin its shutdown sequence. You will hear the doors lock and the ambient lights turn off. Wait for the screen to remain completely black for at least 30 seconds to ensure all systems have suspended.
After the screen turns off, step away from the vehicle. The car should lock automatically. If it does not, press the key fob button or use the Tesla app to lock it manually. A sleeping Tesla will not have any lights active, and the side mirrors will fold in (if equipped with auto-folding). This state confirms that the high-voltage battery is disconnected from the auxiliary systems, making it safe to proceed with the charger installation.
Install your home wall charger
With the car powered down and the garage prepped, you are ready to mount the Tesla Wall Connector. This section walks you through the physical installation of a Level 2 home charger. We will focus on safety, compatibility, and secure mounting to ensure your charging setup is reliable for years to come.
1. Select the mounting location
Choose a spot on your garage wall that is close to your electrical panel to minimize wire runs. The location should be within three feet of your dedicated circuit breaker. Avoid areas with high humidity, direct sunlight, or potential vehicle impact. Ensure there is enough clearance for the cable to reach your Tesla’s charging port comfortably when parked.
2. Mount the backplate
Use the included template to mark your drill holes on the wall. If you have drywall, use the provided anchors or drill into wall studs for maximum security. Secure the backplate with the supplied screws, ensuring it is level. A solid mount is critical because the connector is heavy when plugged in.
3. Run and connect the cable
Run the charging cable from the electrical panel to the backplate. Use conduit if required by local code or for protection. Connect the cable to the backplate terminals according to the wiring diagram. Tighten all connections securely to prevent overheating. This is the most technical part of the installation; if you are unsure, hire a licensed electrician.
4. Attach the connector and test
Snap the Wall Connector unit onto the mounted backplate. It should click firmly into place. Plug the connector into the unit and then into your Tesla to verify the connection. The light ring should glow white, indicating a successful handshake. Check for any error messages on your car’s display.
Use the included template to mark your drill holes on the wall. If you have drywall, use the provided anchors or drill into wall studs for maximum security. Secure the backplate with the supplied screws, ensuring it is level. A solid mount is critical because the connector is heavy when plugged in.
Run the charging cable from the electrical panel to the backplate. Use conduit if required by local code or for protection. Connect the cable to the backplate terminals according to the wiring diagram. Tighten all connections securely to prevent overheating. This is the most technical part of the installation; if you are unsure, hire a licensed electrician.
Snap the Wall Connector unit onto the mounted backplate. It should click firmly into place. Plug the connector into the unit and then into your Tesla to verify the connection. The light ring should glow white, indicating a successful handshake. Check for any error messages on your car’s display.
Common mistakes to avoid
Most charging failures happen before the cable is even plugged in. They stem from rushing the shutdown sequence or skipping basic safety checks. Fix these errors first to protect your car and your new wall charger.
Leaving the car in "Ready" mode
Plugging in while the car is still powered up causes the connector to lock while hot. This can damage the pins. Always wait for the car to enter "Sleep" mode. The screen should be completely black and the door handles retracted. This ensures the high-voltage system is fully isolated before you connect the charger.
Forgetting to disable charge limit limits
If your car is set to charge to 80% or 90%, the Wall Connector will refuse to send power. It will blink amber instead of green. Check your touchscreen display before plugging in. Set the limit to 100% if you plan to charge fully, or ensure the current limit matches your battery needs.
Ignoring the outlet status light
The Tesla Wall Connector has a status light ring. A solid green light means it is ready. A blinking amber light means a fault. If it blinks, do not force the connector into the port. Check your home circuit breaker and ensure the outlet is receiving power. Forcing a connection on a fault can trip your home panel or damage the car port.
Verify your setup works
Before leaving the garage or heading to work, run through a quick verification sequence. This confirms that the car is properly shut down, the charger is communicating with the vehicle, and the connection is secure. A successful test prevents mid-session disconnects and ensures your home battery or grid connection is handling the load correctly.
Start by locking the car using the key fob or the mobile app. Check the charging port status on the touchscreen or the mobile app to ensure it shows "Ready to Charge" or "Charging." If the port remains open or shows an error, reseat the charger connector firmly until it clicks. Once the car is locked and the charger is engaged, monitor the charging session for the first five minutes. Watch for any fluctuating power levels or error messages on the wall charger display.
Finally, perform a physical check of the cable management. Ensure the charging cable is not kinked, pinched, or exposed to sharp edges that could damage the insulation over time. If you have a home battery system, verify that the energy flow dashboard shows power moving from the grid (or battery) to the car. If all indicators are green and the charging rate is stable, your setup is ready for regular use.
Frequently asked questions about turning off and charging your Tesla
Here are answers to common questions about turning off your Tesla and installing a wall charger.
No comments yet. Be the first to share your thoughts!