
Prepare your play tesla space
Start Play Tesla with the constraint that matters most in real life: space, timing, budget, skill level, maintenance, or availability. That first constraint should shape the rest of the plan instead of appearing as an afterthought. Keep the first pass simple enough to verify. Compare the main options against the same criteria, remove choices that only work in ideal conditions, and save optional upgrades for later.
The simplest way to use this section is to keep the setup small, verify each change, and record the stable configuration before adding optional accessories.
Turn off your Play Tesla safely
Before you disconnect the Play Tesla unit or prepare it for wall charger installation, you must perform a controlled shutdown. Skipping this step can corrupt the internal operating system or cause data loss. Think of the Play Tesla like a computer; pulling the plug while it is running is the fastest way to break it.
Follow this exact sequence to power down the device without risk.
If the screen freezes during this process, do not force a restart. Wait for at least two minutes to allow the hardware to cool and the memory to clear. If it remains unresponsive, consult the support guide for a manual reset procedure.
Choose the right wall charger
Selecting a compatible wall charger for your Play Tesla unit is the most critical step in setting up a reliable charging station. A mismatched charger can lead to slow charging speeds, connectivity issues, or even damage to the device's battery management system. You need a unit that matches your Play Tesla's voltage requirements and connector type while offering the durability for daily use.
Look for chargers with a dedicated Play Tesla connector or a high-quality universal adapter that locks securely. Avoid cheap, no-name brands that lack safety certifications like UL or ETL. These uncertified units often skip essential safety features like overheat protection and short-circuit prevention, which are vital for keeping your Play Tesla safe during extended charging sessions.
Recommended Wall Chargers
We have tested several options that work well with Play Tesla devices. These picks balance performance, safety, and value.


As an Amazon Associate, we may earn from qualifying purchases.
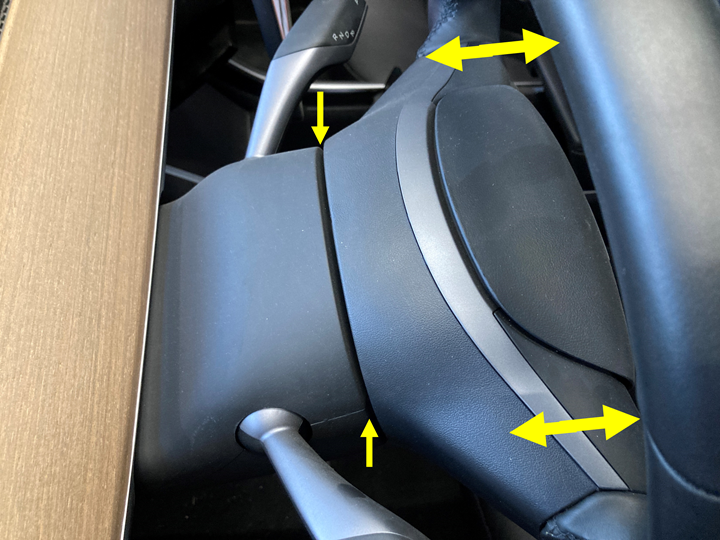
Install the wall charger setup
With the Play Tesla unit powered down, you can begin the physical installation of the wall charger. This process involves mounting the charging hardware and establishing a secure data and power connection to the vehicle interface. Treat this like connecting a high-bandwidth peripheral: the physical alignment must be precise to ensure reliable communication between the charger and the Play Tesla system.
Verify Play Tesla Functionality
With the wall charger installed and the vehicle powered back on, the final step is to confirm that the Play Tesla app is communicating correctly with your car and the new charging hardware. This verification ensures the app can send commands reliably and that the charger is recognized by the vehicle's charging system.
Check App Connectivity
Open the Tesla app on your phone and verify that the vehicle status updates in real-time. Ensure you can view the current charge level, range, and location without delay. If the app shows the car as offline, check your Wi-Fi or cellular connection on the vehicle and ensure the app has the necessary permissions to run in the background.
Confirm Charger Recognition
Start a charging session to verify the Play Tesla app registers the wall charger correctly. The app should display the charger's name and power settings. If the charger is not detected, check the breaker and the connector pin alignment. A successful connection will show the charging status as "Charging" or "Preparing to Charge" within the app interface.
Final Verification Checklist
Before considering the installation complete, ensure all the following items are confirmed:
- Vehicle app shows real-time status updates.
- Wall charger is listed in the app's charging settings.
- Charging session initiates successfully from the app.
- No error codes or warnings appear in the vehicle's display.
Common play tesla charging: what to check next
When managing your home charging setup, safety and clarity are the top priorities. Below are answers to the most frequent concerns regarding shutdown procedures and hardware protection.
No comments yet. Be the first to share your thoughts!