
What changed in the Gen 4 model
The Gen 4 Universal Wall Connector is Tesla's answer to a fragmented charging market. While it looks like previous models, it now uses the North American Charging Standard (NACS) natively. This is the same plug found on new Teslas, but the unit includes a built-in adapter for other electric cars.
For existing Tesla owners, upgrading from a previous generation Wall Connector might seem unnecessary, but the Gen 4 offers enhanced reliability and a sleeker design. However, the real game-changer is its compatibility with all electric vehicles. Tesla has opened up its charging ecosystem, and this Wall Connector works with non-Tesla EVs using an adapter – a move that could dramatically increase its appeal. It’s a smart move, positioning Tesla not just as a car manufacturer, but as a leader in EV infrastructure.
The shift to NACS is important. It simplifies charging for Tesla drivers and, with the Universal Wall Connector, opens the door for other EV owners to benefit from Tesla’s charging technology. This isn’t just about convenience; it’s about standardizing the EV charging landscape. Early reports suggest the Gen 4 is also more robust and easier to install than previous versions, though that's something we’ll explore further in this guide.
Ultimately, the Universal Wall Connector Gen 4 is more than just a charger; it's a statement. It signals Tesla’s willingness to collaborate and contribute to a broader EV future. Whether you’re a dedicated Tesla enthusiast or own another EV, this Wall Connector is worth considering. It provides a fast, reliable, and increasingly universal charging solution.
Tools & Materials Checklist
You need your full kit ready before opening the electrical panel. Stopping halfway to run to the hardware store is a recipe for mistakes.
Here's a comprehensive checklist: a 40A, 48A, or 50A breaker (depending on your desired charging speed – more on that later), appropriately sized wire (6 AWG copper or 4 AWG aluminum, check local codes), a conduit (PVC or metal, sized to accommodate the wiring), wire connectors, a torque wrench (absolutely essential for proper connection tightness), and appropriate safety gear. Don't skimp on safety!
Beyond the electrical components, you’ll need a drill with appropriate bits for your wall material, a stud finder, a level, a pencil, and potentially a fish tape for running wires through conduit. A voltage tester is also crucial for verifying power is off before working on any wiring. Finally, don't forget the Tesla Wall Connector itself and its QuickStart guide, which contains the QR code needed for setup.
Crucially, always check your local electrical codes. These codes vary by region and are designed to ensure safety. Ignoring them can lead to dangerous situations and potential fines. It’s better to be safe and compliant than to cut corners. Contact your local building department if you're unsure about any requirements.
- 40A, 48A, or 50A Breaker
- 6 AWG copper wire
- Appropriate Conduit (PVC or Metal)
- Wire Connectors
- Torque Wrench
- Safety Glasses
- Gloves
- Drill and Bits
- Stud Finder
- Level
- Pencil
- Fish Tape (potentially)
- Voltage Tester
- Tesla Wall Connector
- QuickStart Guide
Checking your electrical panel capacity
This is arguably the most important step, and it’s where many DIYers get tripped up. Before even considering installation, you must assess your electrical panel’s capacity. Simply put, can it handle the additional load of a Level 2 charger? Overloading your panel is a fire hazard and a recipe for disaster. Ignoring this step is a huge risk.
The Wall Connector offers different amperage options: 40A, 48A, and 50A. The higher the amperage, the faster your charging speed – but also the more power it draws. A 40A circuit typically requires a 50A breaker, a 48A circuit requires a 60A breaker, and a 50A circuit requires a 70A breaker. These are general guidelines, and local codes may dictate specific requirements.
If your electrical panel doesn’t have sufficient capacity, you’ll need to install a subpanel. This involves running a new, larger-gauge wire from your main panel to a dedicated subpanel near the Wall Connector location. This is a more complex undertaking and may require a professional electrician. A subpanel adds cost and complexity, but it’s essential for safety and reliable operation.
Working with electricity is inherently dangerous. Always turn off the main breaker before working on your electrical panel. Verify the power is off with a voltage tester. If you’re not comfortable working with electricity, hire a qualified electrician. It’s not worth risking your safety or your home.
Running wire and conduit
Once your electrical panel is prepped, it’s time to run the wiring and conduit. This involves carefully routing the wire from the breaker in your panel to the Wall Connector mounting location. The method you use will depend on your home’s construction and your local codes. Exposed wiring is generally discouraged, so conduit is the preferred method.
There are two main types of conduit: PVC and metal. PVC is easier to work with and less expensive, but metal conduit offers better protection against physical damage. Choose the type that best suits your needs and complies with local regulations. Ensure the conduit is properly sized to accommodate the wiring and any future upgrades. Wire fill calculations are important to prevent overheating.
When running the conduit, consider the mounting scenario. Will it be exposed on the exterior of your home, or buried underground? Buried conduit requires a deeper trench and additional protection against moisture and damage. Regardless of the mounting method, ensure the conduit is securely fastened and protected from the elements.
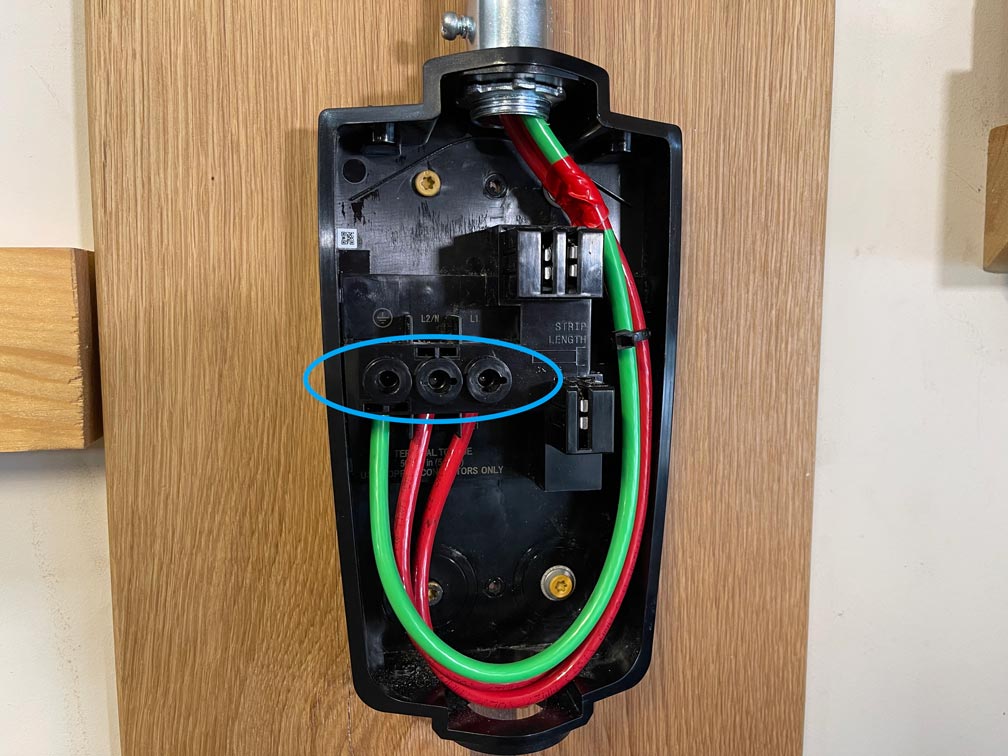
Proper grounding is critical for safety. The conduit must be properly grounded, and the grounding wire must be securely connected to the Wall Connector and the electrical panel. Double-check all connections to ensure they are tight and secure. A loose connection can cause arcing and potentially start a fire. Follow the instructions in the Universal Wall Connector Installation Manual meticulously.
- Route wire from breaker to mounting location
- Install conduit (PVC or metal)
- Secure conduit properly
- Ensure correct wire fill
- Properly ground conduit and wiring
- Double-check all connections
Wall Connector Mounting & Connection
With the wiring and conduit in place, you can now mount the Wall Connector to the wall. Choose a location that is easily accessible and protected from the elements. Ensure the wall can support the weight of the charger and that there are no obstructions behind it. Use a stud finder to locate wall studs and secure the mounting bracket to them for maximum stability.
Once the mounting bracket is securely attached, you can connect the wiring to the Wall Connector. This is where the torque wrench comes into play. Proper torque is essential to ensure a reliable connection and prevent overheating. Refer to the Wall Connector’s documentation for the correct torque specifications for each connection. Under-torquing can lead to loose connections, while over-torquing can damage the terminals.
After connecting the wiring, use the Tesla app to scan the QR code on the back of the Wall Connector. This will initiate the connection process and allow you to configure the charger. The app will guide you through the setup process, including setting a charging schedule and configuring energy usage limits.
If you encounter any issues during the connection process, check the wiring connections and ensure the breaker is fully engaged. The Tesla app provides diagnostic tools to help you troubleshoot common problems. If you're still having trouble, consult the Tesla support website or contact a qualified electrician.
Tesla App Setup & Configuration
The Tesla app is your control center for the Wall Connector. Once the physical installation is complete and the QR code is scanned, the app will walk you through the configuration process. This includes setting up a charging schedule, which allows you to take advantage of off-peak electricity rates and minimize your energy costs.
You can also monitor energy usage within the app, providing valuable insights into your charging habits. This data can help you optimize your charging schedule and reduce your overall energy consumption. The app also allows you to adjust charging limits, preventing the charger from drawing more power than your electrical panel can handle.
The app’s diagnostic tools are invaluable for identifying and resolving any issues with the Wall Connector. It can detect problems with the wiring, the connection to the electrical panel, or the charger itself. If a problem is detected, the app will provide helpful troubleshooting tips.
Don’t overlook the different charging profiles available in the app. You can customize these profiles to suit your specific needs and preferences. The mobile connector adapter can also be configured within the app, allowing you to use different charging connectors as needed.
Finding a Certified Installer
If you're not comfortable with any aspect of the installation process, or if you’re unsure about your electrical panel’s capacity, hiring a Tesla-certified installer is a smart move. These installers have been trained by Tesla and are familiar with the Wall Connector’s installation requirements.
The benefits of using a certified installer include peace of mind, a professional installation, and compliance with local electrical codes. They can also handle any necessary permitting and inspections. A professional installation will also ensure your Wall Connector is covered by Tesla’s warranty.
Tesla maintains a directory of certified installers on their site. Expect to pay between $500 and $1,500 for a standard installation, depending on how far your panel is from the garage.
Self-installation may void your warranty, so it’s important to consider that before deciding to go the DIY route. While the Universal Wall Connector is designed to be relatively easy to install, it’s always best to err on the side of caution and hire a professional if you’re unsure.
- Peace of mind
- Professional installation
- Code compliance
- Warranty coverage
DIY vs. Professional Installation: Tesla Universal Wall Connector Gen 4
| Cost | Time Commitment | Skill Level Required | Safety Risk | Warranty Implications |
|---|---|---|---|---|
| Generally Lower | Significant - Several Hours to a Full Day | High - Requires electrical expertise, understanding of local codes, and potentially circuit panel upgrades | High - Working with high voltage electricity presents a serious shock and fire hazard if not done correctly. | Potentially Voided - Tesla warranty may be affected if installation is not performed by a certified installer or doesn't meet local electrical codes. |
| Generally Higher | Moderate - Typically a few hours, depending on complexity | Low - Relies on the expertise of a qualified electrician | Low - Professional installers adhere to safety standards and best practices. | Maintained - Installation by a Tesla Certified Installer ensures warranty compliance. |
| Variable - Depends on required permits and local electrical inspection fees. | Dependent on installer availability. | N/A - Installer handles the technical aspects. | N/A - Safety is the responsibility of the professional installer. | N/A - Installer provides assurance of code compliance. |
| May require purchasing additional tools and materials. | Requires dedicated time for planning, execution, and potential troubleshooting. | Requires knowledge of electrical wiring, circuit breakers, and potentially conduit installation. | Risk of incorrect wiring, overloading circuits, or non-compliance with local electrical codes. | Potential for issues if the installation doesn't meet Tesla's specifications. |
Illustrative comparison based on the article research brief. Verify current pricing, limits, and product details in the official docs before relying on it.

No comments yet. Be the first to share your thoughts!