
Why proper shutdown matters
"Playing Tesla" extends beyond driving; it includes how you end the session. An electric vehicle is a rolling computer with a high-voltage battery system that demands specific shutdown protocols. Unlike internal combustion engines, Teslas manage thermal systems and software updates even when parked. Improper shutdowns can drain the 12-volt auxiliary battery or interrupt background processes. Exiting the vehicle requires the car to transition from "Driving" to "Sleep" mode, ensuring the battery management system balances cell voltages and the touchscreen displays the correct lock status.
Think of the shutdown sequence as the car’s nightly routine. Just as you wouldn’t leave a laptop running heavy applications before closing the lid, you shouldn’t leave your Tesla in a high-power state before locking it. Proper shutdown protects your investment by ensuring the electronics and battery pack enter a low-power sleep mode efficiently.
Turn off your Tesla correctly
Shutting down a Tesla is not like turning off a traditional combustion engine vehicle. There is no key to remove and no engine to idle down. Instead, the car manages its own power states, but you must guide it through a specific sequence to ensure the vehicle locks securely and the high-voltage battery disconnects properly. Skipping steps can leave the car in a "ready" state, draining the 12-volt battery or preventing the doors from locking.
Follow this exact sequence to power down your Model 3, Model Y, Model S, or Model X.
Bring the vehicle to a complete stop. Keep your foot firmly pressed on the brake pedal. This ensures the regenerative braking system engages and the car remains stationary while you plan around the screen menus.
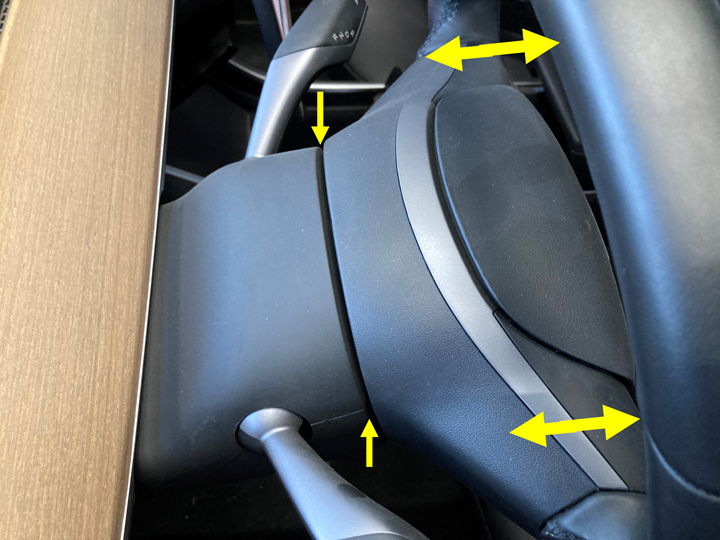
Press the left stalk down once to engage Park. You should see the gear indicator change to "P" on the instrument cluster and the center touchscreen. The car must be in Park before the power-off option becomes active or logical.

On the center touchscreen, tap the car icon (usually at the bottom left) to open the Safety & Security menu. Scroll down and select "Power Off." Do not just walk away; the car needs this command to initiate the shutdown sequence.
After tapping Power Off, the screens will go black. Wait approximately 30 to 60 seconds. During this time, the car is shutting down its infotainment system, cooling fans, and high-voltage components. The interior lights will turn off, and you will hear the compressor stop. Do not attempt to leave until the screens are completely dark.
Once the screens are off, exit the vehicle and pull the door handle. The mirrors should fold in automatically if you have "Auto Mirror Folding" enabled. Check that the side mirrors are folded and the door locks have engaged. If the car is still in "Ready" mode, the mirrors will not fold, and the doors will not lock.
If you miss the confirmation step or try to leave before the screens go dark, the car may remain in a partially powered state. This can drain the 12-volt auxiliary battery over time, leading to a "dead 12V" situation where the car cannot be unlocked or started. Always wait for the full shutdown cycle to complete before walking away.
Install the Wall Connector
Adding a Tesla Wall Connector to your home is the most reliable way to integrate charging into your daily routine. While Level 2 charging is possible with portable cords, a dedicated wall unit provides higher amperage, faster charging speeds, and a cleaner, safer installation. Tesla designs the Wall Connector to be hardwired or connected via a conduit, ensuring it meets residential electrical codes.
Because this involves high-voltage electrical work, the installation must be performed by a licensed electrician. They will assess your panel’s capacity, determine the correct circuit breaker size, and ensure the mounting location is accessible and safe. This professional step is not just a formality; it prevents fire hazards and ensures your vehicle’s onboard charger communicates correctly with the home unit.
1. Choose the Mounting Location
Select a spot in your garage or driveway that allows the charging cable to reach your vehicle’s port comfortably. The Wall Connector cable is 23 feet long, so measure from your parking spot to the wall. Avoid locations where the cable might be exposed to road salt, standing water, or physical damage from vehicles. The unit should be mounted at a height that is easy to reach but out of the way of foot traffic.
2. Prepare the Electrical Circuit
Your electrician will run the appropriate gauge wire from your main panel to the mounting location. For a 40-amp circuit, which is common for the standard Wall Connector, this typically requires 8 AWG copper wire. If you opt for the higher-power 48-amp or 72-amp models, thicker wiring and larger breakers are necessary. The conduit must be sealed properly if running through exterior walls to prevent moisture ingress.
3. Mount the Unit and Connect Wiring
Once the electrical path is ready, the electrician mounts the backplate to the wall using the provided anchors. They then connect the hot, neutral, and ground wires to the terminal block inside the unit. The Wall Connector is weather-resistant (IP55 rated), so outdoor installations require a simple rain cover or a sheltered spot. After securing the front faceplate, they will test the connection for proper grounding and voltage.
4. Enable and Configure Charging Settings
With the hardware installed, the final step is configuration. You can set the maximum amperage via the Tesla mobile app or the device’s onboard interface. This allows you to share electrical capacity with other high-draw appliances in your home if needed. Once configured, the Wall Connector will automatically recognize your Tesla when the charging port is plugged in, starting the session immediately without needing a card or app tap.
Ensure the wall is structurally sound and the location allows the 23-foot cable to reach your car’s charging port without stretching or kinking. Avoid areas with standing water or direct road spray.
An electrician checks your main breaker panel to ensure it has enough spare capacity for a dedicated 40-amp or 50-amp circuit. This step prevents overloading your home’s electrical system.
The electrician installs the necessary conduit and copper wire from the panel to the chosen wall location. This creates a protected pathway for the high-voltage current required for fast charging.
Keep the Battery Healthy
Think of your Tesla’s battery like a human body: it needs the right amount of food, rest, and protection from the elements to stay strong. The lithium-ion cells inside your Model 3 or Model Y are durable, but they degrade faster when pushed to extremes. By managing charge limits and temperature, you extend the life of your most expensive component.
Set the Right Charge Limits
Daily charging habits matter most. For Model 3 and Model Y vehicles with lithium-iron-phosphate (LFP) batteries, Tesla recommends charging to 100% at least once a week to keep the battery management system accurate. However, for Long Range and Performance models with nickel-based batteries, keeping the charge between 20% and 80% for daily use significantly reduces stress on the cells.
You can set these limits directly in the vehicle or via the Tesla app. Navigate to Charging on the touchscreen and adjust the Charge Limit slider. Setting a daily limit prevents unnecessary deep cycling, which is the primary cause of capacity loss over time.
Manage Temperature Exposure
Heat is the enemy of battery longevity. Lithium-ion batteries degrade fastest when stored at high states of charge in hot environments. If you live in a hot climate, try to park in a garage or shaded area, especially after charging to a high percentage. The battery thermal management system works hard to keep cells cool, but passive protection reduces the energy drain and thermal stress.
Similarly, extreme cold increases internal resistance, making charging slower and reducing range. Preconditioning the battery while plugged in warms the cells to an optimal temperature before you drive or charge, improving efficiency and protecting the chemistry during high-power sessions.
Common shutdown mistakes
Turning off your Tesla is usually quick, but small oversights can drain the 12-volt battery or leave the car vulnerable. The most frequent error is ignoring the screen’s shutdown checklist. When you press the brake and shift to Park, the car prepares to sleep, but it won’t fully power down if background systems are still active.
Always check for these signs before leaving the vehicle:
- Cabin Overheat Protection: If left on, the HVAC will run to cool the interior. This consumes significant power and can drain the 12-volt battery over time.
- Dog Mode or Camp Mode: These features keep climate control and media systems running. Ensure you’ve exited these modes unless you’re actively using them.
- Sentry Mode: While useful for security, Sentry Mode records continuously. If you’re parking for more than a few hours without power, this can drain the battery.
Another common mistake is not locking the car properly. Simply walking away with the key fob in your pocket won’t arm the security system. Always verify the car has locked by checking for the horn chirp and mirror folding. If the car remains unlocked, your settings and data remain exposed.
To avoid these issues, make it a habit to review the screen before you step out. A quick glance at the lock icon and climate status ensures your Tesla is ready for sleep mode. This simple step protects your battery and keeps your vehicle secure.
Your pre-drive checklist
Before you shift into drive, take thirty seconds to confirm your Tesla is safe and ready. A quick scan of the touchscreen and physical indicators prevents most common issues.
If any warning lights remain on, address them before departing. This final check ensures your vehicle is in optimal condition for the road ahead.
No comments yet. Be the first to share your thoughts!